Brincadeiras a parte, mas tomar café ficou mais divertido com a Ripple Maker , pois torna-se mais prazeroso tomar a bebida quando chega-se a mesa com desenho. Graças à técnica que usa estêncil, pó e leite vaporizado.
O equipamento, disponível no Estados Unidos, efetua até mil impressões por carga de cápsulas de café em pó. A base de imagens é acessada por rede sem fio em conjunto um aplicativo gratuito para configurar as imagens. O preço deste brinquedo fica em torno de US$ 999, ou um serviço mensal de US$ 85. Um dia terei uma, este equipamento é muito util em eventos onde os cafés poderiam ser servido com o logo da empresa.
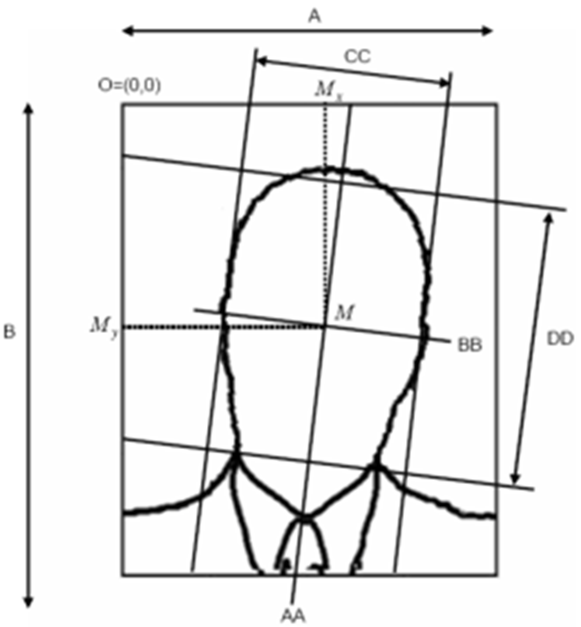
Uma tarefa que demanda precisão computacional é o rastreamento deformável da face. Pois durante o object tracking (após a localização da face), muito facilmente a rastreabilidade se perde em função de diversas anomalias matemáticas. Então o laboratório do Certiface vem dedicando esforço para obter o maior desempenho neste assunto. Vem o resultado do trabalho:
Recebi o email de aprovação da NVIDIA para utilização dos recursos Deep Learning acelerado por GPU que dobrará a performance dos treinamentos de redes neurais.
“Your application for the program CUDA Registered Developer Program is approved.
Congratulations, you are now a member of the CUDA/GPU Computing Developer Program. Should you have any questions or issues with you membership please don’t hesitate to contact us.
Best regards,
NVIDIA Developer Relations”
Treinar amostragens maiores e mais sofisticadas com mais rapidez somente é possível com aceleração por GPU de rotinas matemáticas para redes neurais profundas.
O resultado é acelerações significativas de performance para o treinamento de redes neurais em uma única GPU NVIDIA GeForce® GTX™ TITAN X.²
Agora vamos para a nova fase do game, Deep Learning na GPU para o Certiface!
A seguir os primeiro testes…
# optirun ./mnistCUDNN
cudnnGetVersion() : 3007 , CUDNN_VERSION from cudnn.h : 3007 (3.0.07)
Host compiler version : GCC 4.8.5
There are 1 CUDA capable devices on your machine :
device 0 : sms 5 Capabilities 5.0, SmClock 1019.5 Mhz, MemSize (Mb) 2047, MemClock 2505.0 Mhz, Ecc=0, boardGroupID=0
Using device 0
Testing single precision
Loading image data/one_28x28.pgm
Performing forward propagation ...
Testing cudnnGetConvolutionForwardAlgorithm ...
Fastest algorithm is Algo 1
Testing cudnnFindConvolutionForwardAlgorithm ...
^^^^ CUDNN_STATUS_SUCCESS for Algo 0: 0.049184 time requiring 0 memory
^^^^ CUDNN_STATUS_SUCCESS for Algo 1: 0.051776 time requiring 3464 memory
^^^^ CUDNN_STATUS_SUCCESS for Algo 2: 0.059488 time requiring 57600 memory
^^^^ CUDNN_STATUS_SUCCESS for Algo 4: 0.188672 time requiring 207360 memory
^^^^ CUDNN_STATUS_NOT_SUPPORTED for Algo 3: -1.000000 time requiring 0 memory
Resulting weights from Softmax:
0.0000000 0.9999399 0.0000000 0.0000000 0.0000561 0.0000000 0.0000012 0.0000017 0.0000010 0.0000000
Loading image data/three_28x28.pgm
Performing forward propagation ...
Resulting weights from Softmax:
0.0000000 0.0000000 0.0000000 0.9999288 0.0000000 0.0000711 0.0000000 0.0000000 0.0000000 0.0000000
Loading image data/five_28x28.pgm
Performing forward propagation ...
Resulting weights from Softmax:
0.0000000 0.0000008 0.0000000 0.0000002 0.0000000 0.9999820 0.0000154 0.0000000 0.0000012 0.0000006
Result of classification: 1 3 5
Test passed!
Testing half precision (math in single precision)
Loading image data/one_28x28.pgm
Performing forward propagation ...
Testing cudnnGetConvolutionForwardAlgorithm ...
Fastest algorithm is Algo 1
Testing cudnnFindConvolutionForwardAlgorithm ...
^^^^ CUDNN_STATUS_SUCCESS for Algo 0: 0.032640 time requiring 0 memory
^^^^ CUDNN_STATUS_SUCCESS for Algo 1: 0.035456 time requiring 3464 memory
^^^^ CUDNN_STATUS_SUCCESS for Algo 2: 0.051904 time requiring 28800 memory
^^^^ CUDNN_STATUS_SUCCESS for Algo 4: 0.200064 time requiring 207360 memory
^^^^ CUDNN_STATUS_NOT_SUPPORTED for Algo 3: -1.000000 time requiring 0 memory
Resulting weights from Softmax:
0.0000001 1.0000000 0.0000001 0.0000000 0.0000563 0.0000001 0.0000012 0.0000017 0.0000010 0.0000001
Loading image data/three_28x28.pgm
Performing forward propagation ...
Resulting weights from Softmax:
0.0000000 0.0000000 0.0000000 1.0000000 0.0000000 0.0000714 0.0000000 0.0000000 0.0000000 0.0000000
Loading image data/five_28x28.pgm
Performing forward propagation ...
Resulting weights from Softmax:
0.0000000 0.0000008 0.0000000 0.0000002 0.0000000 1.0000000 0.0000154 0.0000000 0.0000012 0.0000006
Kits de captura de imagens para obter imagens que atendam o padrão ICAO ou ISO 19794-5 estão com os dias contados, Pois o Certiface 3D permite tempo real informar a não conformidade, da ISO utilizada em biometria facial. cujo principal objetivo é medir que a imagem é passível de processamento biométrico ou não.
Utilizando a tecnologia 3D da Intel, Certiface 3D capture e processa a nuvem tridimensional e processa em tempo real os requisitos e remove o fundo, assim atendendo um dos requisitos mínimos da ISO 19794-5 (fundo uniforme). O algoritmo foi inteiramente desenvolvido pelo laboratório da empresa. Em breve disponível no Mercado.
Por enquanto disponibilizo um vídeo demonstrativo.
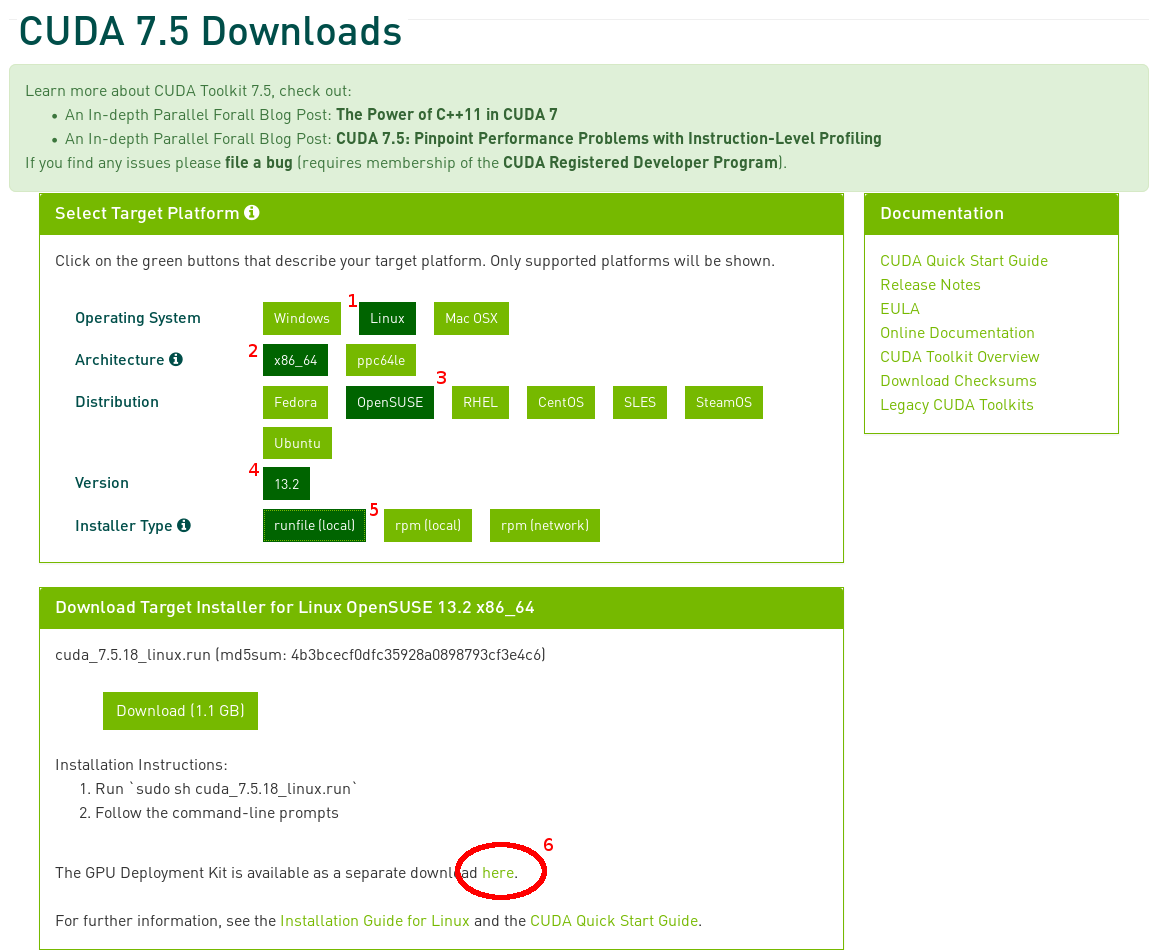
E finalmente efetue o download do pacote cuda_7.5.18_linux.run
Partindo do principio que o driver já esta instalado e configurado, a seguir execute o arquivo, com as seguintes resposta baseado no exemplo abaixo:
# ./cuda_7.5.18_linux.run
Logging to /tmp/cuda_install_2681.log
Using less to view the EULA.
Do you accept the previously read EULA? (accept/decline/quit): accept
You are attempting to install on an unsupported configuration. Do you wish to continue? ((y)es/(n)o) [ default is no ]: yes
Install NVIDIA Accelerated Graphics Driver for Linux-x86_64 352.39? ((y)es/(n)o/(q)uit): no
Install the CUDA 7.5 Toolkit? ((y)es/(n)o/(q)uit): yes
Enter Toolkit Location [ default is /usr/local/cuda-7.5 ]:
Do you want to install a symbolic link at /usr/local/cuda? ((y)es/(n)o/(q)uit): yes
Install the CUDA 7.5 Samples? ((y)es/(n)o/(q)uit): yes
Enter CUDA Samples Location [ default is /root ]: /root/cuda
Installing the CUDA Toolkit in /usr/local/cuda-7.5 ...

Installing the CUDA Samples in /dados/programas/cuda ...
Copying samples to /dados/programas/cuda/NVIDIA_CUDA-7.5_Samples now...
Finished copying samples.

===========
= Summary =
===========

Driver: Not Selected
Toolkit: Installed in /usr/local/cuda-7.5
Samples: Installed in /dados/programas/cuda, but missing recommended libraries

Please make sure that
 - PATH includes /usr/local/cuda-7.5/bin
 - LD_LIBRARY_PATH includes /usr/local/cuda-7.5/lib64, or, add /usr/local/cuda-7.5/lib64 to /etc/ld.so.conf and run ldconfig as root

To uninstall the CUDA Toolkit, run the uninstall script in /usr/local/cuda-7.5/bin
To uninstall the NVIDIA Driver, run nvidia-uninstall

Please see CUDA_Installation_Guide_Linux.pdf in /usr/local/cuda-7.5/doc/pdf for detailed information on setting up CUDA.

***WARNING: Incomplete installation! This installation did not install the CUDA Driver. A driver of version at least 352.00 is required for CUDA 7.5 functionality to work.
To install the driver using this installer, run the following command, replacing <CudaInstaller> with the name of this run file:
 sudo <CudaInstaller>.run -silent -driver

Logfile is /tmp/cuda_install_2681.log
Agora se tudo estiver funcionando corretamente, execute:
# cd /root/NVIDIA_CUDA-7.5_Samples/1_Utilities/deviceQuery
# optirun ./deviceQueryv
*** (remova o optrun se não possuir 2 placa de vídeos)

./deviceQuery Starting...

CUDA Device Query (Runtime API) version (CUDART static linking)

Detected 1 CUDA Capable device(s)

Device 0: "GeForce GTX 860M"
 CUDA Driver Version / Runtime Version 7.5 / 7.5
 CUDA Capability Major/Minor version number: 5.0
 Total amount of global memory: 2048 MBytes (2147352576 bytes)
 ( 5) Multiprocessors, (128) CUDA Cores/MP: 640 CUDA Cores
 GPU Max Clock rate: 1020 MHz (1.02 GHz)
 Memory Clock rate: 2505 Mhz
 Memory Bus Width: 128-bit
 L2 Cache Size: 2097152 bytes
 Maximum Texture Dimension Size (x,y,z) 1D=(65536), 2D=(65536, 65536), 3D=(4096, 4096, 4096)
 Maximum Layered 1D Texture Size, (num) layers 1D=(16384), 2048 layers
 Maximum Layered 2D Texture Size, (num) layers 2D=(16384, 16384), 2048 layers
 Total amount of constant memory: 65536 bytes
 Total amount of shared memory per block: 49152 bytes
 Total number of registers available per block: 65536
 Warp size: 32
 Maximum number of threads per multiprocessor: 2048
 Maximum number of threads per block: 1024
 Max dimension size of a thread block (x,y,z): (1024, 1024, 64)
 Max dimension size of a grid size (x,y,z): (2147483647, 65535, 65535)
 Maximum memory pitch: 2147483647 bytes
 Texture alignment: 512 bytes
 Concurrent copy and kernel execution: Yes with 1 copy engine(s)
 Run time limit on kernels: Yes
 Integrated GPU sharing Host Memory: No
 Support host page-locked memory mapping: Yes
 Alignment requirement for Surfaces: Yes
 Device has ECC support: Disabled
 Device supports Unified Addressing (UVA): Yes
 Device PCI Domain ID / Bus ID / location ID: 0 / 1 / 0
 Compute Mode:
 < Default (multiple host threads can use ::cudaSetDevice() with device simultaneously) >
deviceQuery, CUDA Driver = CUDART, CUDA Driver Version = 7.5, CUDA Runtime Version = 7.5, NumDevs = 1, Device0 = GeForce GTX 860M
Result = PASS
Pronto, veja um exemplo de processamento gráfico em tempo real…
Em março de 2010, escrevi uma artigo para a revista Linux Magazine, onde mencionei sobre o potencial computacional das GPU junto ao mercado de visão computacional. Após cinco anos, com o aumento exponencial do poder computacional, vejo que o uso destes recursos em Redes Neurais Artificiais são praticamente inevitáveis. Então para começar deixo neste post, a instalação do gdk (GPU Deployment Kit) na plataforma openSUSE.
# ./cuda_352_39_gdk_linux.run
Logging to /tmp/gdk_install_2933.log
Welcome to the GPU Deployment Installer.
Enter installation directory [ default is / ]:
Installation complete!
Installation directory: /
Ao termino, para testar, entre na pasta examples e compile o mesmo. E PRONTO!
# make
cc -I ../include -I /usr/include/nvidia/gdk/ -c -o example.o example.c
cc example.o -lnvidia-ml -L ../lib/ -o examplE

# optirun ./example
Found 1 device

Listing devices:
0. GeForce GTX 860M [0000:01:00.0]
 Changing device's compute mode from 'Default' to 'Prohibited'
 Restoring device's compute mode back to 'Default'
All done.
Press ENTER to continue...
Neste post, veremos como executar recurso 1-click-install do openSUSE na linha de comando. Como exemplo utilizei o link para o pacote multimidia do openSUSE:
OCICLI http://opensuse-community.org/codecs-gnome.ymp
If you continue, the following repositories will be subscribed:
 * http://ftp.gwdg.de/pub/linux/packman/suse/openSUSE_13.2
 * http://opensuse-guide.org/repo/13.2/
If you continue, the following software packages will be installed:
 * dvdauthor07
 * ffmpeg
 * flash-player
 * gstreamer-plugins-bad
 * gstreamer-plugins-bad-orig-addon
 * gstreamer-plugins-base
 * gstreamer-plugins-good
 * gstreamer-plugins-good-extra
 * gstreamer-plugins-libav
 * gstreamer-plugins-ugly
 * gstreamer-plugins-ugly-orig-addon
 * libdvdcss2
Continue? y/N
Como de costume, disponibilizo os links 1-Click Install dos pacotes multimídia (codecs, encrypted DVDs e outos) do sistema openSUSE Leap 42.1. E também abaixo os links para o KDE e Gnome.